Friday 21 March 2014

My favourite bloggers

I'm not sure exactly when my obsession with blogging and bloggers began, but I do know where it all began for me.

The very first blog I ever got into was JacksGap. For those of you who don't know Jack is a British University Student who began his own youtube channel documenting his Gap Year. He and his twin, Finn have become majorly successful and have even gone to third world countries with Comic Relief to help raise money and awareness. Although this may make them sound very serious, their videos are always lots of fun and they have collabbed with people like Sam Pepper, who appeared on Big Brother. Here is my favourite video from Jack and Finn:

After Jack and Finn, it wasn't long before I realised that there were a plethora of youtubers and bloggers who loved makeup as much as I do. I followed some of my favourite people from the blogging community on youtube long before I realised that they had blogs;
Zoella who is also on youtube, is best friends with Louise who also has a youtube channel, and both Zoe and Louise are friends with Tanya (again a youtuber), who's married to Jim, who's sister is samantha (a.k.a Pixiwoo), who created Real Techniques. So you can really see that the blogging world is just one large community of people who have something to say or share.

Now while Beauty and Fashion are my true interests, I also like to see other people's interests and learn new things. One of my favourites I have already mentioned in my DIY Kimono Post,  LaurDIY, her DIY projects are always beautiful and her fashion and makeup posts thrown in just make for the perfect blog.

Starting my own blog has really opened my eyes to some new and exciting blogs that I probably would never have found on my own.

StrikeAPose is a fashion and beauty blog set up by Mary and Rose. Mary has been particularly supportive of me since I started my own blog and she is genuinely talented. She recently made her first youtube video, which is well worth watching.

Lilly Pebbles is a new inspiration for me. Her style is so chilled and effortless, yet she always looks amazing.

Obviously there are many more blogs that I could and probably should mention so I will list all of the blogs that I subscribe to below. Please let me know if there are any blogs I've missed that you follow or if you have found a gem in this post.

WonderForest
Pixiwoo
Easy Access Beauty
Beyond Blush
FleurDeForce
GhostParties
Jia And The Stars
Liana Beauty
Lifes Lust Haves
Jacks Gap
Essie Button
Lily Pebbles
Ninas Bargain Beauty
So Sue Me
Jenna Marble
Tess Christine
Strike A Pose
Pointless Blog
Tanya Burr
Laur DIY
Marcus Butler
Joe Suggs
Sam Pepper
Josh Wade
Tyler Oakley
Vivianna Does Makeup
Zoella

Monday 17 March 2014

Smashbox Makeover

Although this makeover was courtesy of Smashbox, all views expressed in this post are my own. 

This weekend I had my makeup done by Yvonne at Smashbox for a 21st I attended. Lately I have found myself stuck in somewhat of a rut, always using the same products and I was looking for some fresh inspiration. I will usually go with a brown/black shimmery eye and a neutral/red lip for a night on the town. 
I had never really tried Smashbox products so this was the perfect opportunity for me to freshen up my makeup collection. 

Yvonne started with my eyes. Lately I've been very stressed and finding it hard to sleep and so have been noticing my dark circles becoming more prominent. Yvonne put a little bit of Colour Correcting Primer under my eyes before applying Concealer in Light/Medium. I invested in the Concealer in Fair/Light for everyday use. One of Yvonnes top tips was pat the concealer on under the eye in order to increase blood flow to the area. This will naturally brighten the skin. She used their new Full Exposure eyeshadow palette, which is not yet available on Boots.ie, but is available in store. I think it costs around €35. 

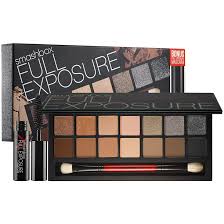
Although I do usually stick with a neutral eye palette, this was slightly new for me in the fact that the colours Yvonne used were matte. The top line of shadows in the palette are shimmers and the bottom line is totally matte. She first primed the lids using their eye primer, and then used the 4th colour in the bottom row (ivory/white) to fill in the lid up as far as the browbone. She then used the 5th colour in the bottom row all over the lid before using the darker brown next to it to draw in a contour along the upper lashline and into the crease. She used a blending brush similar to the No.7 brush I mentioned in my Favourites Post to blend the contouring colour out over the lid before darkening the colour in the crease by patting the black colour on the right into the crease with a small brush. She then used the same blending brush to blend this up towards the browbone. All of the colours were very pigmented and it was very easy to build the colour up to the desired smokey effect. 

I usually don't do my eyeshadow before my base, but Yvonne made a very good point in that you don't have to be as careful in applying the shadows and avoiding fallout. Before applying my foundation she primed my face with their original primer. The primer dries in evenly and quickly without leaving a film on the face. You don't have to apply foundation straight after primer. Foundation can be applied after allowing the primer to sink in or immediately. She used their heavier coverage foundation all over the face. She applied it with a flat foundation brush and alternated the direction of her brush strokes in order to reduce the appearance of visible brush strokes. I invested in the lighter everyday foundation  in shade 1 for everyday use. 

Yvonne explained to me that she doesn't like to do the face piece by piece but likes to move around and give things time to settle, and give herself the opportunity to think about what she is doing. After my foundation was applied she moved back to my eyes and filled in my brows using their brow powder in Brunette. She applied the wax before the powder, which was new to me. I was under the impression that wax was applied after in order to set the powder. 

She then applied some pressed powder to my T-zone and chin where I would be likely to become shiny throughout the night. 

I really wanted a cat-eye flick as they are still in for SS/14 and I can't do them myself. She used their gel eyeliner and the Real Techniques Eyeliner Brush to create the perfect flick. What's unique about this brush is that it is all one piece. This prevents little hairs from going astray and messing up your line after a few washes. I asked Yvonne to share some tips for creating the perfect eyeliner for people like me, who struggle with liquid liner. Her advice was to look down into a mirror which is placed on a table in front of you. This will cause your eye to half-close, stopping you from blinking. Also she advised that when you come to the edge of your eye, rather than carrying on the line to extend into the flick, turn your brush and draw your flick in to meet the line. I have been practising using these tips and the results have been amazing! After finishing my eyeliner she applied their Mascara. While there was absolutely nothing wrong with the mascara there also was nothing remarkable about it. 

She then used a fan brush to highlight my cheekbones using a powder and to contour using a gorgeous shimmer brick that could easily be used individually for different things. To keep my face relatively neutral as I wanted to go with a strong lip, she used a coral blush to add some colour to my cheeks. 

Finally she used a purple eyeliner to line and fill in my lips before covering it with their lipstick in Vivid Violet.
The lipstick was a fantastic colour, but didn't last all that long.

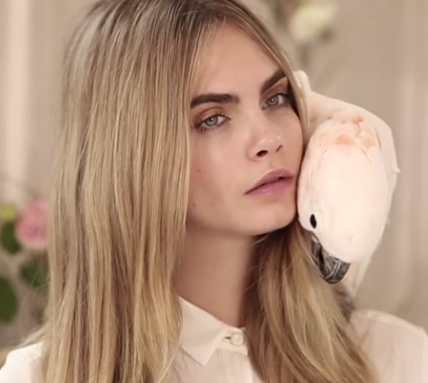
This was the finished look. 
The lipstick didn't last very long and had to be topped up throughout the night using my Collection lipstick in Scorned, which I can't find on Boots.ie but is available in store. I already mentioned this lipstick in my Make Up Haul Post. The rest of the makeup did seem to last fairly well, although my face looks abnormally white in several photos. This is what it looked like after almost 8 hours. 


I even managed to somewhat recreate the look the following morning for work. 


Smashbox also provided me with a free Try-it Kit which I will be reviewing soon. 
Let me know your thoughts below and if you will be investing in any of the products I've mentioned. 

Wednesday 12 March 2014

Bloglovin'


Today I want to take the time to tell all of you about Bloglovin'. Some people who blog themselves may already know about it, and how amazing it is, but there are a lot of people reading my blog who no doubt won't know it.

Bloglovin' is a blog reader. It's basically a social network. You log in to your account and you follow the blogs that you like. I follow quite a few and will post recommendations in the next few weeks in a post about my favourite bloggers.

Bloglovin' works really well for Bloggers as well as readers. Not only will it give you your blog fix but it suggests new blogs that you may be interested in based on your subscriptions. This can be a huge inspiration boost when you are having a bout of bloggers block.

There are few things that I enjoy more than opening my bloglovin' to find that someone has liked a post or followed me. It's a huge confidence boost to know that someone cares so much about what you have to say that they want to be notified the next time you post.

For those of you who are iPhone users, there is an app for Bloglovin' which is just as useful as the webpage. I like to read through my blogs when I have a spare few minutes, on the bus or in the ads of a TV show. Through both the App and the Web Version you can comment directly on posts and interact with other readers of your favourite blogs.

I would love to see some of you joining Bloglovin' and getting involved in the blogging community.
You can sign up here and you can then find my blog to follow it here.

Please let me know if you have any problems and how you get on in the comments below.

Monday 10 March 2014

March Wishlist

March is now upon us and so is lent. I don't usually do lent, but this year I decided to test my willpower. I have resolved not to buy any more cosmetics or makeup products until Easter.
I do have a serious addiction and I need to reign it in a little bit and this should hopefully help.
I've decided to torment myself by posting a Wishlist, and who knows? Come April I may treat myself to some of these things.

Essie Nail Polish in A Cut Above


Essie Nail Polishes are really good quality and retailing in boots for around €9.99, they are an absolute bargain. This chunky pink glitter would be gorgeous over any colour: black, nude, white. I love anything that glitters. However, I would guess that I now own close to 100 nail polishes and the last thing I need is another one.

Collection Lasting Perfection Ultimate Wear Concealer

Zoella swears by this concealer,and if it's good enough for her it's good enough for me to try. 


If you don't want to watch the whole video then you can skip to 6:30 where you'll see her talk about the concealer. 

Garnier Micellar Cleansing Water

This one is a bit of a roundabout story so please bear with me. Last year while on holiday in the South of France, I was looking for some cleanser in a small cosmetics shop called Nocibé. I found a bottle of Micellaire Water and I literally only bought it because it had one of these bottles which I wanted to fill up with nail polish remover when the cleanser was gone. 
As it happens, I was very impressed with the micellaire water and when it was gone, and I was back on Irish soil a replacement was ridiculously hard to locate. I have an alternative that I'm using at the moment, which will feature in a later skincare post but as soon as that is gone I will be investing in this.  

Tanya Burr Nail Polish

One of my favourite bloggers Tanya Burr has recently brought out a line of lip glosses and nail polishes, and while I'm not much of a lip gloss girl, the nail polishes are simply perfect! My favourite shades are Little Duck, New York Night and Penguin Chic, but they are all lovely and I will be buying them very soon. 

Lorena Floral Tieback Jumpsuit

I love this jumpsuit. Floral prints are so cute and pretty in the Summer. This piece would be so easy to dress up or dress down. Paired with flip flops it would be perfect for a walk on the beach or a stroll through the market and paired with a blazer, heels and earrings it would take you out on the town. This is a must have for Summer. 

These are just a few things that have crossed my path recently. I hope you've been inspired to treat yourself too. Please let me know in the comments below. 

From now on wherever possible I will provide links to make it easier for people to shop my blog posts. 
Also please let me know what you would like to see me post about next by taking part in the poll on the right sidebar. 

Thanks for reading.

Thursday 6 March 2014

Review: L'Oréal Paris Studioline #TXT Texture Styling Wave Creating Spray

WAVE IT.
This product claims to create texturised waves on straight hair, specifically formulated to help protect hair against heat, while leaving the hair non-heavy and non-crunchy.

As a sort of disclaimer I should probably begin this review by stating that my hair is naturally somewhere between a wave and a very messy curl when left to dry naturally. It's also very thick and can be quite stubborn to style. If I don't blowdry it my hair tends to get very matted, which leads to frizzynesss when I do manage to brush it.

I already mentioned this product in my Haul Blog Post. I bought this purely on the merits of the Volumising Spray I have from the same line. The spray is relatively cheap retailing at €4.99, which if it worked would make it a steal.

I started the process by washing my hair, adding some John Frieda Frizz Ease Serum for thick hair and by spraying the wave spray over my wet hair. I know that everyone's hair is different but I could have done with some further direction than "spray generously".

I then "half-blowdried" my hair, basically I blowdried the excess water out of my hair and styled my fringe.


I then stopped blowdrying and twisted my hair into a few topknots. The bottle says "at least two" but I have a lot of hair and I wanted fairly defined waves so I did put in a good few. I pinned them so that they would stay while I continued blowdrying my hair.


I kept blowdrying my hair for about another 10-15 minutes and then took out the topknots. At this stage the waves did look fairly defined but I couldn't leave my hair in just six curls so I had to separate them.


I then continued to blowdry my hair, while scrunching the waves upwards.


I wasn't that happy with the quality of my hair. It was really messy and not very wavy. It reminded me of the way my hair would look after I came out of the sea on holidays and left my hair dry naturally. It wasn't a very good look for me and the only place I would actually wear my hair like that would be on holidays, where my hair would look like that anyway.

I used my Remington Silk Curling Wand to make the waves more defined. I took some pictures to show how it looked along the way, and this is the finished look.


The look did take quite a bit of time to do and it would have been faster to just use my curling wand in the first place. 

I followed the instructions on the back of the bottle exactly. The bottle claims to leave your hair irresistibly soft to the touch, non-crunchy and non-heavy. I did find my hair a bit sticky and crunchy afterwards to be honest.

In writing this review I felt that I should give a balanced and well researched view so I looked online at how other people found the spray. 

The reviews in general that I found were poor enough, however I did find this article with some pictures from the press release of the product. My hair looked nothing like that unfortunately. 

I also found a tutorial from L'Oréal Paris on how to use it, which was totally different from the instructions printed on the back of the bottle. 


Maybe if you followed these instructions you would have a better result from the spray, but for now from me, its a thumbs down. 

Wednesday 5 March 2014

#OOTD


Yesterday I had college and I also had an informal interview. I wouldn't have time to change between the two so it was important to keep my outfit simple for college but yet appropriate for an interview. 

The red tartan dress I wore is from TK Maxx. I bought it there just after Christmas. I think it cost around €16.99. I bought the navy coat with the black fur detail on the collar in H&M in the Crescent Shopping centre in Limerick just two weeks ago. It was in the Sale and it cost just €20. It's really stylish and warm at the same time. Although we are coming into the Spring/Summer Season it will most likely be cold in Ireland for another few months so it's not too late to invest in a coat. 

My snood is from Penneys, although they may be out of stock by now. I bought it before christmas and it cost around €5. I love mustard and I think it's really flattering on every skin tone. 


My black boots I have already featured in an #OOTD post. They are from New Look and cost €44.99. I really love them because they are so pretty. They are a lot higher than they look though and can be super hard to walk in. They are also a little uncomfortable, not enough to stop me wearing them though. No pain no gain right? 


Yesterday my look was quite Wintery so I wanted to stick with it and wear a berry lip. In order to pull that off I needed to keep the rest of my face simple. I used Smashbox Liquid Halo HD Foundation in 1 as a base and used Smashbox High Definition Concealer in Fair/Light to hide my dark circles. I'm having a slight breakout on my chin at the moment so I used No.7 Stay Perfect Blemish Cover in Medium to cover that up. To set my base I used my Rimmel Stay Matte Pressed Powder in Peach Glow, because I was leaving the house at 8am and not coming back until close to 7pm, and I don't really like fixing my makeup in college. On my eyes I used the highlighter from my Sleek Face Contour Kit in Light  up as far as my brow bone. I then layered Sin from Urban Decay's Naked Palette all over my eyelid. I used Buck from the same palette to contour along the crease. I highlighted my tear duct and the very outer corner of my eye with Virgin from the same palette to open my eye. I just used Rimmel Scandaleyes Rockin' Curves mascara on my lashes and filled in my brows using L'Oréal Superliner Brow Artist in Blonde. I used a dusting of the bronzer from my Sleek Face Contour Kit to contour my cheekbones and Bourjois Blush in 95 Jasper Rose to add a little bit of colour to my cheeks. I lined my lips with my No.7 Precision Lips Pencil in fire and then filled them in using Collection Gothic Glam Lipstick in 2 Scorned. To make the colour last I covered that in Barry M Lip Laquer Crayon in 2. 


Monday 3 March 2014

Cheap and Cheerful Fashions: Kimonos

I have a serious love for kimonos and I really need to stop buying them. I have far too many at this point and after an email from River Island yesterday letting me know that they are getting in more, I can feel the itch starting again. So in my well established wisdom I scoured the internet for a cheap alternative that I could share. 

Here is a link to the River Island kimonos in case you're too lazy for the alternative. 

So here comes my creative solution to insufficient funds. 


This video comes from a Youtube Channel called Laur DIY, which is well worth checking out if you have time. I love her style and her creativity, and there are lots of her projects that I will be trying out in the next few months. 

I will be keeping my eye out for some suitable scarves in the coming weeks and I will post the results when I have made my kimono. 

Please let me know in the comments if you would like to see more of this on the blog, or if you will also be trying this. 

Sunday 2 March 2014

#OOTD

This outfit is from Friday but I didn't get a chance to upload it until now. 


The teal jeans I bought at TK Maxx in the Modbox section, which has really trendy affordable pieces ranging from size 8-18. The jeans were around €16.99 and they nearly always have something similar.

This polka-dot top is one of my favourites. I'm never sure whether it's black or navy but the cut of it is just so pretty and I love the coral neck detailing. I bought it in the Winter Sale this year in Zara. I think it cost around 6 or 7 euro. It was a steal.

My denim shirt is from River Island. It has diamante detailing on the collar and again I just love it. It was a tad pricey at €75 but it's thick so it can be worn as a shirt in the Winter and as a Jacket in the Summer, making it a really versatile piece.

My brown Cowboy boots have a knit-like effect on the top and they go with absolutely everything. I got them from Penneys before I started college last year so I have had them now for a year and a half. I can't remember how much they cost, probably around €20 but so so worth it.


Friday I spent the morning trying the lavender look for my LFW Makeup Post so that's why may eye-makeup is a bit strange. I already explained my eye makeup over there. On my face I used Rimmel BB Cream in Light as a base, dusted with Rimmel Stay Matte Powder in Peach Glow. On my cheeks I used Philosophy Divine Blushing Bronzer in Deep. On my lips I used Rimmel Lasting Finish by Kate in 03.

You can find a full description of all of these products in my Make Up Haul Post.

Saturday 1 March 2014

LFW Makeup Trends


Last week at London Fashion Week we said goodbye to some of our old reliables and said hello to some new, unique beauty trends for AW/14. Although the fashion world may be having a better time of it I am still waiting for the Summer here in Ireland so I've taken the time to pick out some of the key trends for SS/14. 


Some of the stronger trends such as the cat-eye flick and the metallic colour pallette are still hanging around though to ring in the summer.
A really prominent trend at LFW was the power lip, ranging from pastel colours and bright pops of orange to the light berry lip we saw gracing the runway during the Charles Anastase show.


I love a dark lip in the Winter season but I'm not sure about how well this will fare during the transition into Summer months. Maybe this trend will be wearable in Ireland where it is cold enough year around to make cheeks flushed and lips red, but somehow I think those of us holidaying in warmer climates won't be sporting the berry lip on the promenade. 


A much more wearable trend is the orange lip seen at the DKNY show. Orange lips are surprisingly flattering on almost every skin tone. Makeup Artist, Charlotte Willer used affordable high-street brand Maybelline to create the look. She mixed Maybelline Colour Sensational Vivids Lipstick in Electric Orange and Neon Red. 


The trick when choosing an orange lipstick for paler girls is to choose a lipstick with a red hue rather than yellow. In order to demonstrate how easy the trend is to pull off I attempted the look this morning. 


I used Mac in Lady Danger and mixed it with Mac in Russian Red because Lady Danger has a yellow base. I kept the rest of my face simple to emphasise the strong lip. 

Designer, J. JS Lee also featured a bright fuschia tone lip, similar to MAC in Pleasurefruit. I was never a huge fan of lip gloss as I find the majority to be sticky and unpleasant to wear and I am pleased to report that gloss has largely gone by the wayside for the Summer Season. Edging into its place is a matte lip. This look can be achieved by blotting lipstick and then dusting lightly with a translucent powder through a tissue.


Another strong trend to emerge this year was blue-tone eyeshadow. I am of the opinion that blue eyeshadow isn't the most flattering but I can just about tolerate a lavender eye similar to that seen at the Holly Fulton show.

Makeup artist Andrew Gallimore applied this lilac colour from just above the lashline to the brow bone, and while this looks stunning on the runway I don't think I will see it gracing the streets of Ireland any time soon. I created a similar, more wearable look today using the No.7 Neutral Radiance Eye Palette and the Urban Decay Bamboo Palette. 

No.7 Neutral Radiance

 I used the Blue-Lilac colour in the upper left hand corner of the No.7 pallette all over the eyelid to create a base. I then used the copper-pink colour you see underneath to contour the outer part of my eye-socket to create depth. 


 I then applied VZI by Urban Decay in the inner corner of my eye to really make the pinks and purples pop. I then blended them as far towards my browbone as I was comfortable with to stay in keeping with the trend. I ran the blue-lilac colour under the outer corner of my eye with an angled brush in order to also tie in the Ephereal look we saw grace the catwalk of one of my favourite designers, Julien MacDonald. Cheekbones were highlighted and faces were kept simple to emphasise the otherworldlyness of the models. The look took some getting used to and I did have a few double takes when I passed the mirror throughout the day, but I must admit it did grow on me. This is probably as blue as I would go with my eyeshadow but I would never say never. There was once a time when I hated tartan.


  Another way of wearing the blue eyeshadow trend was shown at the David Koma Show where the models eye was first covered with a gold eyeshadow as a base, similar to the Bourjois Shimmering Shine Liquid Eyeshadow in Molecule D'or that I frequently use. The outer half of the lid was thickly lined with a navy eyeliner. Navy really brings out the colour of the eyes. This is another really wearable way to go with it.
The gold eyeshadow used in the David Koma show tied neatly into another trend to feature heavily in the coming season, metallic glitter eyeshadows. I find Urban Decay to be very reliable for glittery eyeshadows and if applied with their Eye Primer Potion the eyeshadows don’t have much fallout.

Thick flicks of eyeliner were also seen at the Sister by Sibling show and the Topshop show and it looks like this trend is here to stay. I am not a huge fan of this trend but it is largely down to my own ineptness. Liquid eyeliner and I are not a good match and no matter how I try I just cannot create the cat-eye flick I so crave. 
Topshop went for a bold eye look. Models sported a messy eyeliner both on the lid and on the waterline under the eye. They themed their makeup “Beach Party” and it certainly did smack of Oxegen. 


The models had bronzed skin and grungy hair and eye makeup. Although a fairly natural and non-preened look it was drastically different from the pretty, natural faces we saw grace the runway at the Temperley show. The soft sheer makeup was beautiful and really made the models look fresh as a daisy. Minimal makeup is easy to pair with a pastel lip and a white tone eyeshadow in the summer. I would recommend using a tinted moisturiser or BB cream to create this look.


One of my favourite reveals at LFW is that freckles are back! Being Irish I do have an abundance of freckles and a tendency to want to hide them. At the Paul Smith show the makeup artists actually drew freckles across the models’ cheeks and nose using an eyebrow pencil. Backstage at Charles Anastase each girl was given a beauty spot under her left eye because imperfections are beautiful. The natural and real nature of the catwalks really struck me this year and it is a trend I truly adore.


Despite this many models sported bronzed skin and although for the last few seasons pale skin has been in, it appears tan is back. When Topshop Models weren’t sporting their grungy beach look they were instead bronzed babes showing off a bright red/orange lip.


Big lashes seem to be in this season and not just on the top lid. The Makeup Artist at the Jean Pierre Braganza show applied false lashes to both top and bottom lids of the girls before sending them down the runway. 

Mulberry perhaps showed the prettiest faces at  LFW, although they did seem to go very heavy on the mascara. I’m not sure spider lashes will ever be “in”. 
 What do you think of the trends at LFW? Will you be sporting any of them in the months to come? Let me know in the comments below.