Thursday 11 June 2015

Smouldering Purple Eye

As of late I've found myself trying to move away from my comfort zone of browns, golds and neutrals and attempting to infuse a little bit of colour into my makeup routine. A good way I've found of doing this is to pick a colour that's not so out there, purple in my case and introduce it as an element of your look rather than the main event.

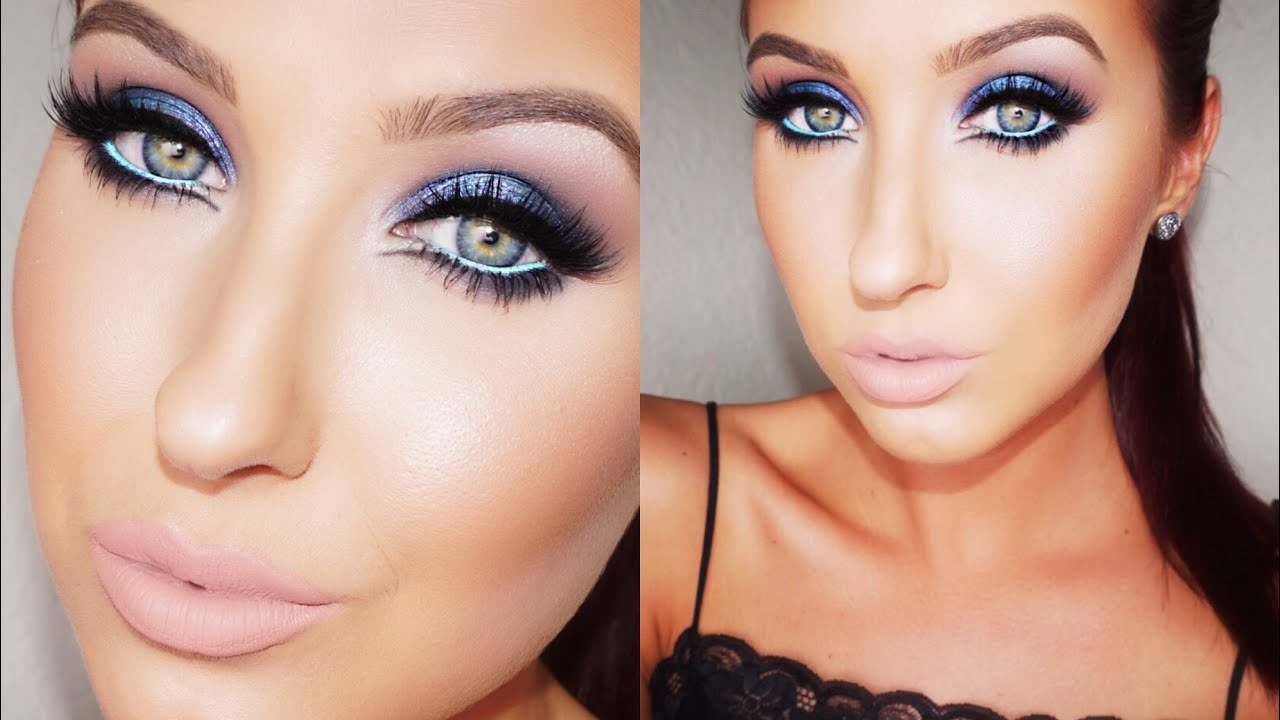
For this look I decided to base my look on rose-golds and accent the look with purples. This is a little bit different for me but still not completely out of my comfort zone. I'd love to have the courage to go for something crazy like this. 


For those of you that don't know, this is Jaclyn Hill. She is so gorgeous and talented. Her videos are fun to watch and at the same time really easy to follow and learn from. Go watch her right now if you haven't already. You can thank me later. 
For now this is a bit much for me and quite frankly I don't have the skills/product to create it so I'll be working up to it. 


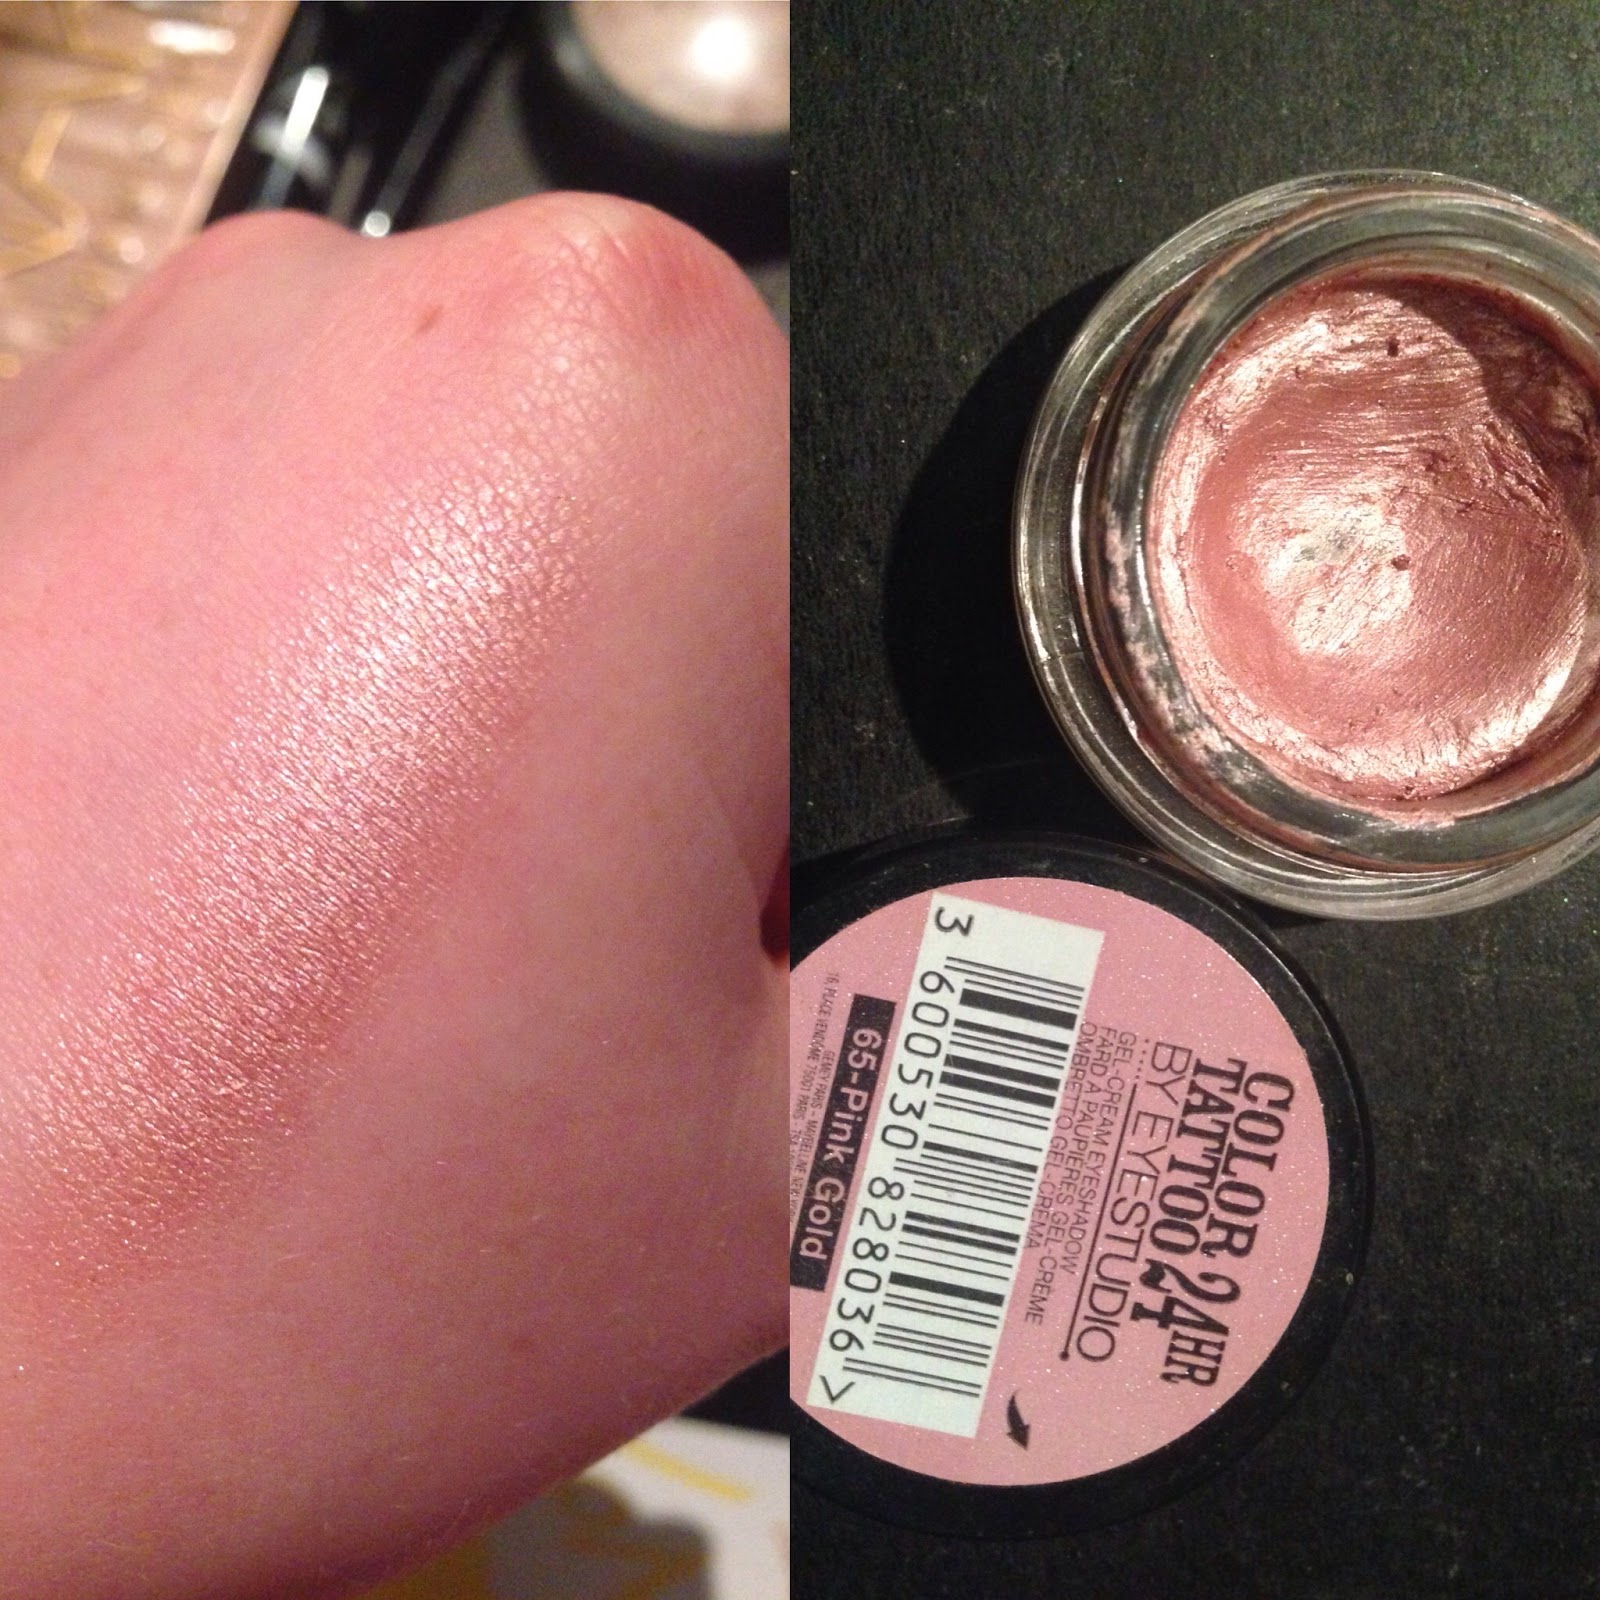
So for this look I began by priming my eyes with Urban Decay Primer Potion. I then covered my lid in Maybelline Colour Tattoo in Pink Gold.

This gives a really nice colour on it's own and it also works fab as a base for other shadows. I use this colour all the time. the formula of the colour tattoo shadows is fantastic. They are just as good as MAC Paintpots and literally half the price. Using my MAC 217 I fanned Makeup Geek Unexpected

into the crease as a transition shade, deepening the colour and blending out the cream shadow from earlier. Be careful not to take this colour too high as it can be a little difficult to blend. I then wet a flat, dense shader brush with MAC Fix+ and patted the shade trick from my Urban Decay Naked 3


palette along the bottom of my lid. This shadow is full of really chunky glitter and it's the most divine gold! Using it wet really foils the shadow on the lid and keeps it shimmering and catching the light all day long. This was where I had actually planned to stop but I really wasn't happy with the way unexpected was sitting in and above my crease so I decided to add a little more definition to the look. On my Real Techniques Silicone Liner brush I took Factory, again from the Naked 3 palette and placed it in the outer corner of the eye running it in to about half way through the crease.

If your brushes are a little bigger and you find it hard to get that really precise placement of shadows around the eye and especially into the crease, this is a really great way to achieve that. I then used the Inglot 10s brush to blend that using windshield wiper motions as I really wanted to concentrate this colour right into the crease rather than spreading it around above the crease. I also wanted to graduate the colour into the inner half of the crease in a sort of ombre effect. 

As usual I then left my eyes and moved on to the face. I didn't have a huge amount of fallout from the shadows but I really wanted to keep the shadows in a slight wing shape at the outer corner so I folded a cotton pad in half and using Garnier Micellar Water I cleaned off the shadow that didn't fit the bill. 

At the moment I'm running out of my Smashbox Liquid Halo Foundation, which I love, but rather than take the easy road and repurchase this, I'm trying to find something bigger and better. Currently I'm trying out Dior Starskin but the shade I've got my tester in which is 010 I think, is a little light for my skin at the moment. For this look I mixed in a small amount of my MAC StudioFix Foundation in NC25 to darken it up a tad and I also added in a tiny amount of Nars Illuminator in Orgasm. I find the pinky orange shade of this highlight really works well with more tanned skin than if I'm using a lighter foundation in the winter months. I find it to be too warm toned for paler days. I then applied all this with my trusty friend, my Sephora Sculpting Sponge. My sponge has seen better days at this point, having been using it for the best part of 3 months. It's so fantastic though I'll keep using it until I have the opportunity to invest in another, (or it quits on grounds of overwork). My skins been a bit odd lately and has decided to erupt on my chin area. I've one or two really stubborn under the skin spots and the makeup refuses to conceal them. Even the industrial strength warpaint, Collection 2000 Lasting Perfection Concealer can't do it. But on the plus side my skins been less oily, which means I need less powder, which means I get to be more glowy and dewy which has been a welcome development in my book. 

Because I'm not using as much powder I'm bronzing with a powder right away. If I had chosen to go in with my Maybelline Fit Me Stick today my face would have been considerably oilier. Although the colour pay off in those is absolutely brilliant they're quite greasy and in work it can get quite hot so I like to keep those for cooler days. Needless to say mine won't be coming on holidays this year. I really don't feel they would hold up in the heat and humidity. Using a Fluffy Flat Eye Brush, I scuplted out the cheekbone with my Benefit Hoola. I also brought it down the sides of the nose, along the top of the forehead, into the temples and under the bottom lip. Using a fan brush I dusted MAC Soft and Gentle along the tops of the cheekbones, down the centre of the nose and out in a fan at the top and into the cupids bow. I blended all of this out again with the damp sponge. 

I then lined my upper lashline using my Maybelline Master Graphic Liner and also lined my upper waterline with a black pencil liner. I brought both unexpected and trick, two of the shades I used earlier under my eye. You could bring any of the colours you've used on your eye underneath but I chose to stick with the lighter colours as this look was for daywear. I coated my lashes in Urban Decay Supercurl Mascara and applied Eye Candy Lashes in 001.

I picked mine up from TK Maxx for €3.99. These are a steal at that price! I've used mine 3 times now and they're still perfect! I outlined and filled in my brows using my Rimmel brow pencil in Hazel and L'oreal Brow Artist Brow Plumper. I'll be posting a full post on brows soon. 

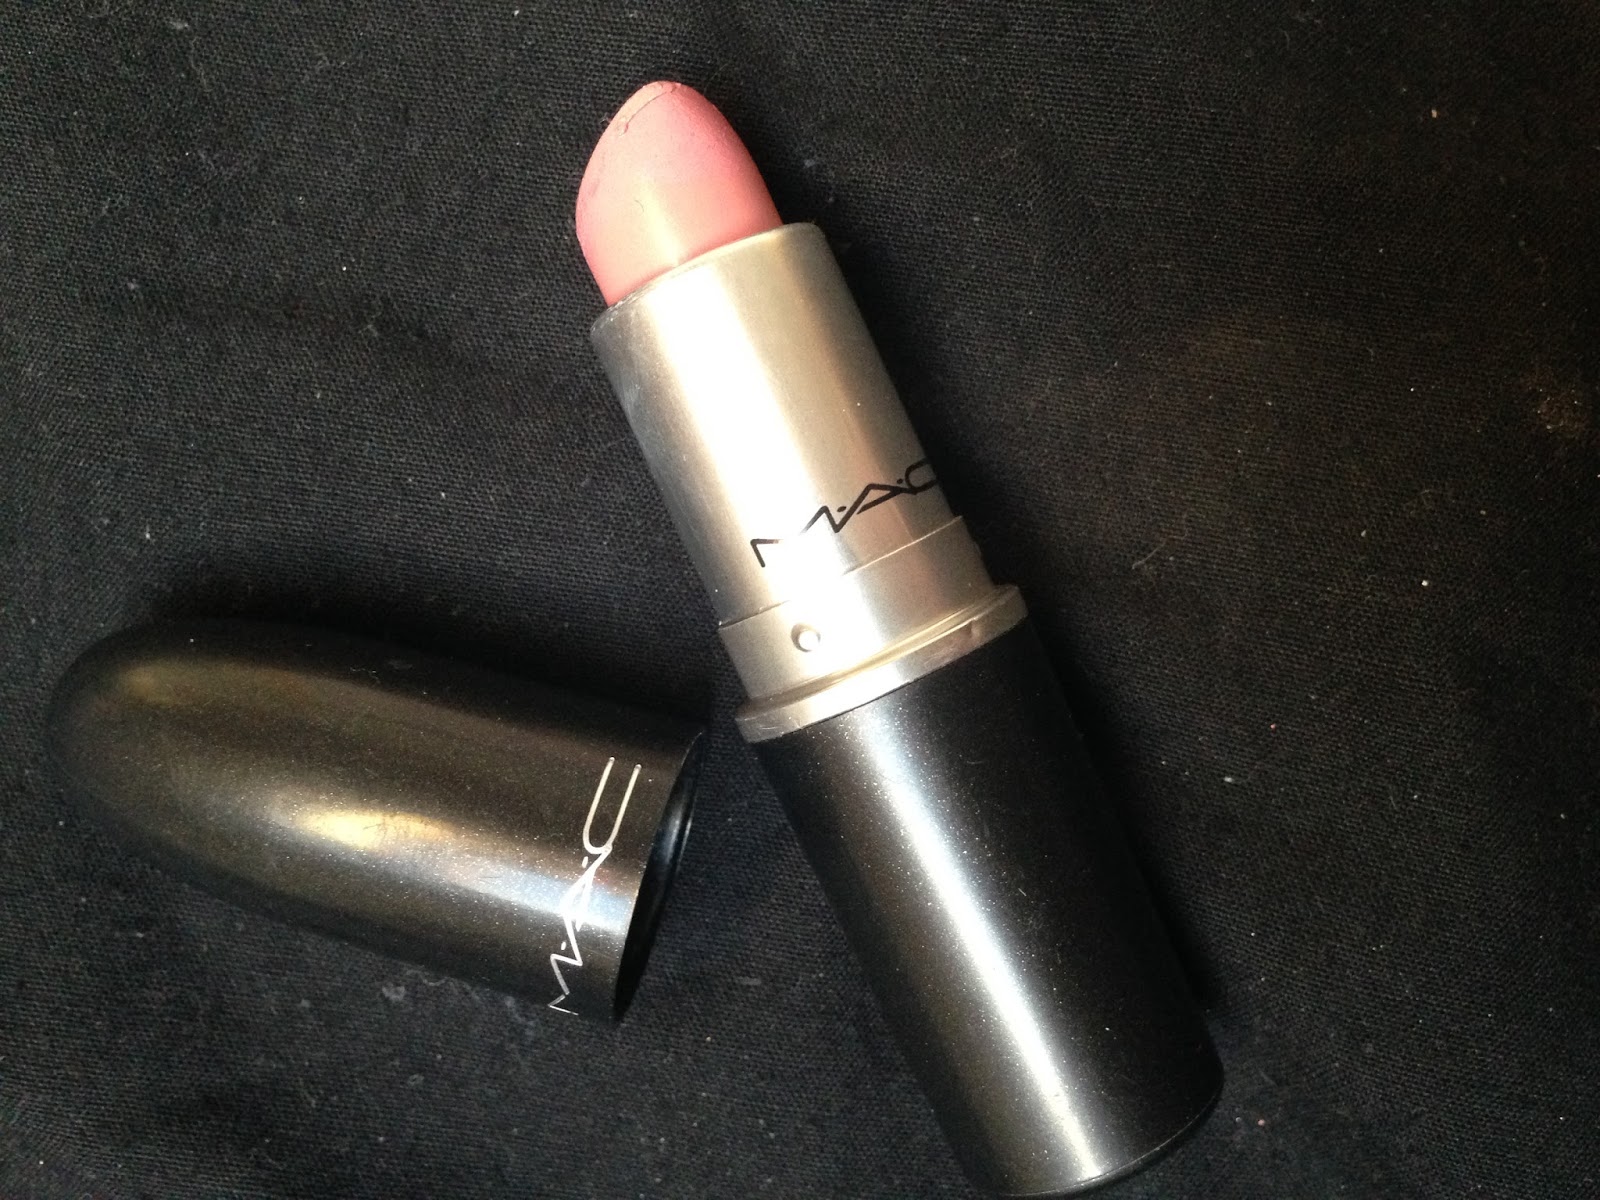
I finished the look by applying MAC Supreme Sheen Lipstick in Pleasurefruit


I love this look and the eyes lasted without budging all day. 

If you'd like to see a mini review on the different foundations I've been trying out let me know on the facebook page and I'll be delighted.
As always if you recreate this look tag me on twitter, facebook and now instagram @kate_mray

Wednesday 27 May 2015

Look of the day

Here's the look I went for today. I went for dinner with family so I wanted to look put together but I had some errands to run first and I didn't want to look completely overdone. I went for a really simple face and lip and then I really pushed it with my eyes.


As usual I started with the eye. I primed my lid from lashline to browbone with MAC Pro Longwear Painpot in Soft Ochre.


I then covered the lid in MakeUp Geek Shadow in Unexpected.

I applied Urban Decay Buck into the crease as a transition shade before with a small brush applying Makeup Geek Shadow in Burlesque

into the outer corner of the eye in a v shape. Using my MAC 217 brush I then swept a black shimmer shade from Soap and Glory

into the crease to darken the look. I depotted this from a palette so I don't know the name of the shade. When I was done I applied a small amount of MAC Naked Lunch under the browbone. You can see this in the picture directly above the black shadow.

There was a little bit of fall-out so before I primed my face using NARS Pore Refining Primer, I did need to clean up a little using my Garnier Micellar Water. I mixed a small amount of my Smashbox Liquid Halo HD Foundation in Shade 1 with my MAC Studio Fix Liquid Foundation in NC25.

I also added in a little bit of NARS Liquid Illuminator in Orgasm.


If I really want to sculpt out the face I like to cream contour. I have a few steps to this. Firstly I'll conceal under my eyes using my Inglot AMC Concealer in Shade 64.

I'll then take my Benefit Watts Up across my cheekbones and out in a fan between my eyebrows up to the forehead. I have slightly oily skin lately so I don't like to take the shimmer highlight anywhere else on my face. I'll sculpt out underneath the cheekbones, into the temple, down the side of the nose, the jawline and under the bottom lip with my Maybelline Fit Me Stick in Soft Honey,


Then anywhere I haven't put light or dark I'll fill in with MAC Prep and Prime Highlight Pen in Radiant Rose.


I then blend everything together using my Damp Sephora Sculpting Sponge. Don't forget to blend the contour along your jawline down onto your neck or you'll end up with a serious line.

At this point I'l start using my powder products. Once I switch to powder products there will be no more cream products applied to my face. Applying creams after you apply powder causes makeup to separate and just look generally patchy.

Using my damp sponge I'll be setting anywhere I would usually get shiny using Rimmel Stay Matte Pressed Powder in Translucent. For me this is down my nose,  on my chin and I also use it to set my undereye concealer.


In order to really sculpt out that contour I'll go over the dark areas with Benefit Hoola and along my cheekbones with MAC Soft and Gentle. Blend, Blend, Blend. Blend until your hands hurt.


I lined my upper lashline using Maybelline Master Graphic Liner and my upper water line using a basic black pencil liner. I lined my bottom waterline using NYX Wonder Pencil in Medium. This is available from Sam McCauley Pharmacies. I applied MakeUp Geek in Unexpected on the outer half of the lower lashline and Urban Decay Buck on the inner half before applying Smashbox Full Exposure Mascara all over my top and bottom lashes.


I swept MAC Blush in Fleur Power across the apples of my cheeks. I finished the look by applying MAC lipstick in Creme Cup all over my lips and spritzing MAC Fix+ all over the face. This gives a really dewy finish to the face.


Heres the finished look.


Tuesday 26 May 2015

L'Oreal La Palette Nude: HOT or NOT


About a month ago I picked up L'Oreal La Palette Nude in 02 Beige at Sam McCauley Pharmacy for just under €15. The palette originally came to my attention after my favourite youtuber, GlamLifeGuru posted a first impressions video on it.


My first problem with the palette is that the version (the only version sold in Ireland) is a totally different colour palette to the one she was able to buy in America.

The palette I have looks like this:


The Palette available in the States looks like this: 


I do wish that the US palette was available here also. I don't understand why the palettes in each zone have to be different. 

Here is a swatch of each shade. The top shade is swatched dry and the bottom swatch has been wet with MAC Fix+ before swatching. 


As you can see the colour pay off from each shade varies dramatically. 

LEFT: Applied Dry            RIGHT: Applied Wet

The first shade in the palette is a frosted cream colour. The colour pay off from this shade is very poor and is barely visible on camera either wet or dry. In person, it gives more of a sheen to the skin than applying any colour.


The second shade is a pearlescent gold with a peach undertone. It's a lot deeper than it looks in the palette. This is one of my favourite shades in the palette. Applying this colour wet actually sheers it out instead of intensifying the colour. This colour is a close dupe for Urban Decay Half Baked but not identical. Urban Decay Baked is a good deal more coppery than this shade. 
                L-R: Urban Decay Half Baked, Loreal Shade Dry, Loreal Shade Wet, Urban Decay Baked


The third shade is a matte cool brown. The colour pay off is poor from this shade and you really need to dig in in order to get it to swatch more opaque. It is a close colour match to Buck from the Urban Decay Naked Palette, but again it is not identical in person. 

L-R: Loreal Shade Dry, Wet, Urban Decay Buck


The fourth shade is a taupe with a silver/grey undertone. The colour pay-off is great from this shadow. It swatches creamy. Wetting this shadow intensifies the colour and makes it more creamy to apply. It is an almost identical dupe for Urban Decay Bust. 


L-R: Swatched Dry, Wet, Urban Decay Bust


The fifth shade is a shimmery, more than pearlescent lemon yellow. It's even more yellow in person than it's showing up in pictures. It's a very strange shade. I don't own anything else like it. I also don't feel like I'll ever have a use for it. If you tend to wear a lot of greens on your eyes you could probably use this colour. I'll probably depot it and give it to a friend. I think this is the only shade in the palette that I won't use at all. 


The sixth shade in the palette is a cool toned matte brown. It's slightly darker than the matte brown we discussed earlier. The quality of the matte shades in this palette leaves a lot to be desired. They come off very patchy and washed out when swatched dry and when swatched wet they are still powdery and lead to quite a bit of fall out. This shade is no different. I do not have another matte brown this dark and cool. 

The seventh shade is a slightly warmer version of the last. It's also the first matte shadow in the palette to swatch dry without being patchy. It's a good dupe for Buck from the Urban Decay Naked Palette, which means that it's also quite similar to the third shade in this palette. 
L-R: Third Shade Swatched Dry, Seventh Shade Dry, Wet, Urban Decay Buck


The eighth shade is a cool toned bronzed gold with a shimmer. It's one of my favourites in this palette and swatches beautifully. I almost always wear this wet. It intensifies the colour and makes it go on the lid nice and creamy. It's an identical dupe for Urban Decay Smog. 

L-R: Dry, Wet, Urban Decay Smog


The second to last shade in the palette is a cool toned grey/black brown. Dry, it swatches out no different than the other matte browns in the palette but as you can see, wet, the colour gets a lot darker and more intense. It is really powdery though and a nightmare as regards fallout. 


The last, and I certainly mean least, shade in the palette is a matte "black". I say black but I'd call it more grey. It's really washed out and when black shadows are a dime a dozen this one just doesn't cut the mustard. 

This palette is a bit hit and miss. While the matte shadows are a major let down,  most of the shimmers are beautiful and there are some exciting dupes for Urban Decay shadows. If you own the Naked Palette I wouldn't advise you to get this, or if you're looking to expand your collection of mattes (as I was), this isn't for you. If you don't own the Naked palette, this might be worth looking into as a more affordable option if you don't mind dealing with a few duds.

All in All I'm going to give this palette a NOT for me because I just didn't need it in my collection but for beginners out there this could be HOT.

Tuesday 19 May 2015

Desk to Dancefloor

This is going to be my first video post so please excuse the quality. This is one of my go-to daytime looks and I'll be posting Part 2 very soon, detailing how to transform it to this

in just a few simple steps. 
Let me know if you prefer the video format in the comments below or if you'd prefer to stick to standard blogging. 


If you recreate this look don't forget to post it to the facebook page: https://www.facebook.com/queenoftartanblog

and tag me on twitter: https://twitter.com/KateMRay

Kate xxx. 

Wednesday 13 May 2015

I'm back!.. Did you miss me?

It's been almost a full year since I've last posted anything here.

I am alive. I have missed blogging but I just haven't been able to find the time or the inclination to bring myself to post.

This year was my final year of University and I honestly feel that it was the most stressful year of my life. I made a huge mistake three years ago in choosing what to study. I have discovered over the last few months that I'm not the only person who makes the wrong decision. There are far more people who make a mistake than you would be likely to think. Making a mistake like this honestly has knocked my confidence so much in the last few years. It's so hard to motivate someone to do something they really don't want to do, and as someone who is competitive, a go-getter and motivated in general it was very hard for me to deal with the changes in myself and my general attitude towards things over the last three years.

Having finished University this week I can tell you that a huge weight has been lifted from my shoulders and I can not wait to get back to my passions, beauty and writing. I've been thinking up posts over the last few weeks but I'd appreciate any ideas you guys can offer me on what you'd like to see me write about or if there's a product you would like to see trialed. I'll also run a competition in the next few weeks so keep an eye out.

All My Love,
Kate xxx